#How to Install Kubernetes on Ubuntu
Explore tagged Tumblr posts
Visit Tumblr Blog
Explore Tumblr blogs with no restrictions, modern design and the best experience.
Last Seen Tumblr Blogs


Fun Fact
Tumblr posted its first advertisements in May 2012 and subsequently earned $13M in revenue.
Text
How to create a single Node Kubernetes Cluster with dual stack IPv4/IPv6 Support with CRI-O and Calico
In this blog post, I have summarized how I have set up a single-node Kubernetes cluster version 1.32 on a fresh Ubuntu 24.04 with dual stack IPv4/IPv6 support. Tested with: Ubuntu 24.04 Kubeadm 1.32.3 CRI-O 1.32 Calico 3.29.3 Step 1: Update the system sudo apt-get update && sudo apt-get upgrade -y Step 2: Disable Swap sudo swapoff -a sudo sed -i '/swap/d' /etc/fstab Step 3: Install required…
0 notes
Text
0 notes
Text
Linux for Developers: Essential Tools and Environments for Coding
For developers, Linux is not just an operating system—it's a versatile platform that offers a powerful array of tools and environments tailored to coding and development tasks. With its open-source nature and robust performance, Linux is a preferred choice for many developers. If you're looking to get the most out of your Linux development environment, leveraging resources like Linux Commands Practice Online, Linux Practice Labs, and Linux Online Practice can significantly enhance your skills and productivity.
The Linux Advantage for Developers
Linux provides a rich environment for development, featuring a wide range of tools that cater to various programming needs. From command-line utilities to integrated development environments (IDEs), Linux supports an extensive ecosystem that can streamline coding tasks, improve efficiency, and foster a deeper understanding of system operations.
Essential Linux Tools for Developers
Text Editors and IDEs: A good text editor is crucial for any developer. Linux offers a variety of text editors, from lightweight options like Vim and Nano to more feature-rich IDEs like Visual Studio Code and Eclipse. These tools enhance productivity by providing syntax highlighting, code completion, and debugging features.
Version Control Systems: Git is an indispensable tool for version control, and its integration with Linux is seamless. Using Git on Linux allows for efficient version management, collaboration, and code tracking. Tools like GitHub and GitLab further streamline the development process by offering platforms for code sharing and project management.
Package Managers: Linux distributions come with powerful package managers such as apt (Debian/Ubuntu), yum (CentOS/RHEL), and dnf (Fedora). These tools facilitate the installation and management of software packages, enabling developers to quickly set up their development environment and access a wide range of libraries and dependencies.
Command-Line Tools: Mastery of Linux commands is vital for efficient development. Commands like grep, awk, and sed can manipulate text and data effectively, while find and locate assist in file management. Practicing these commands through Linux Commands Practice Online resources helps sharpen your command-line skills.
Containers and Virtualization: Docker and Kubernetes are pivotal in modern development workflows. They allow developers to create, deploy, and manage applications in isolated environments, which simplifies testing and scaling. Linux supports these technologies natively, making it an ideal platform for container-based development.
Enhancing Skills with Practice Resources
To get the most out of Linux, practical experience is essential. Here’s how you can use Linux Practice Labs and Linux Online Practice to enhance your skills:
Linux Practice Labs: These labs offer hands-on experience with real Linux environments, providing a safe space to experiment with commands, configurations, and development tools. Engaging in Linux Practice Labs helps reinforce learning by applying concepts in a controlled setting.
Linux Commands Practice Online: Interactive platforms for practicing Linux commands online are invaluable. They offer scenarios and exercises that simulate real-world tasks, allowing you to practice commands and workflows without the need for a local Linux setup. These exercises are beneficial for mastering command-line utilities and scripting.
Linux Online Practice Platforms: Labex provide structured learning paths and practice environments tailored for developers. These platforms offer a variety of exercises and projects that cover different aspects of Linux, from basic commands to advanced system administration tasks.
Conclusion
Linux offers a powerful and flexible environment for developers, equipped with a wealth of tools and resources that cater to various programming needs. By leveraging Linux Commands Practice Online, engaging in Linux Practice Labs, and utilizing Linux Online Practice platforms, you can enhance your development skills, streamline your workflow, and gain a deeper understanding of the Linux operating system. Embrace these resources to make the most of your Linux development environment and stay ahead in the ever-evolving tech landscape.
0 notes
Text
0 notes
Text
How to Install Kubernetes in Ubuntu 22.04 with Kubeadm
How to Install Kubernetes in Ubuntu 22.04 with Kubeadm #kubernetes #ubuntu2204 #kubeadm #kubernetesinstall #kubernetessetup #containerd #docker #homelab #virtualizationhowto #containerruntime #microservices #kubernetesadministration #CKA
In this guide, we will install Kubernetes in Ubuntu 22.04 from scratch using the kubeadm command. Table of contents1. Update your Ubuntu 22.04 hosts2. Setup your hostnames and resolution3. System Settings for KubernetesDisable swap fileKernel parameters4. Installing Containerd container runtime5. Setting Up Kubernetes Repositories6. Installing Kubernetes Components7. Initialize Kubernetes…

View On WordPress
0 notes
Text
My Homelab/Office 2020 - DFW Quarantine Edition
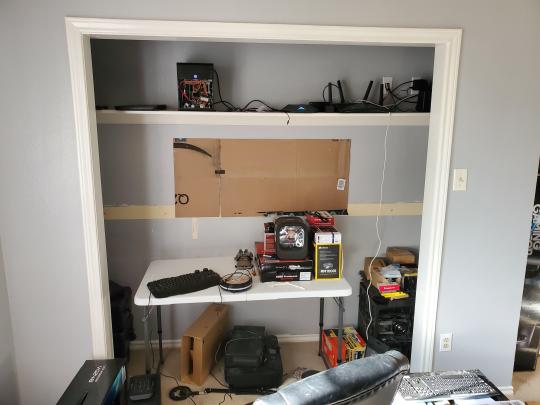
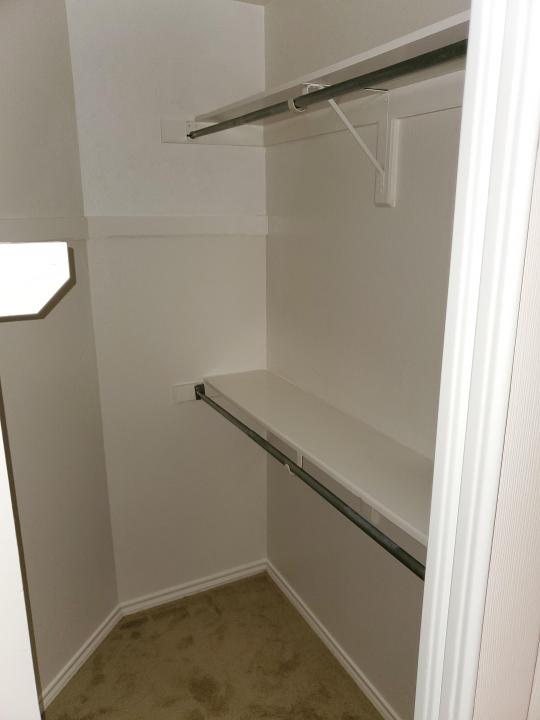
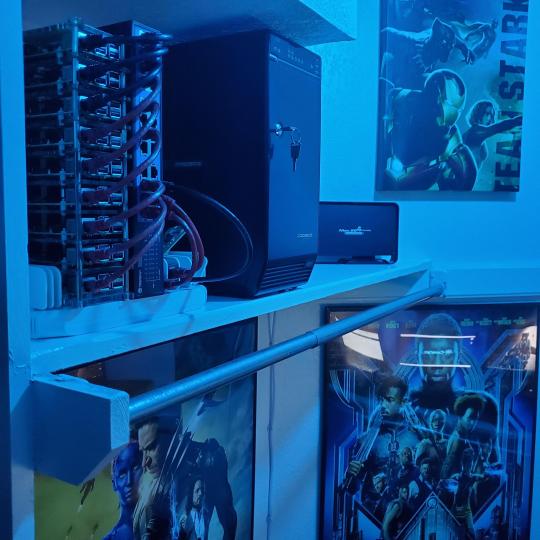
Moved into our first home almost a year ago (October 2019), I picked out a room that had 2 closets for my media/game/office area. Since the room isn't massive, I decided to build a desk into closet #1 to save on space. Here 1 of 2 shelves was ripped off, the back area was repainted gray. A piece of card board was hung to represent my 49 inch monitor and this setup also gave an idea how high I needed the desk.
On my top shelf this was the initial drop for all my Cat6 cabling in the house, I did 5 more runs after this (WAN is dropped here as well).
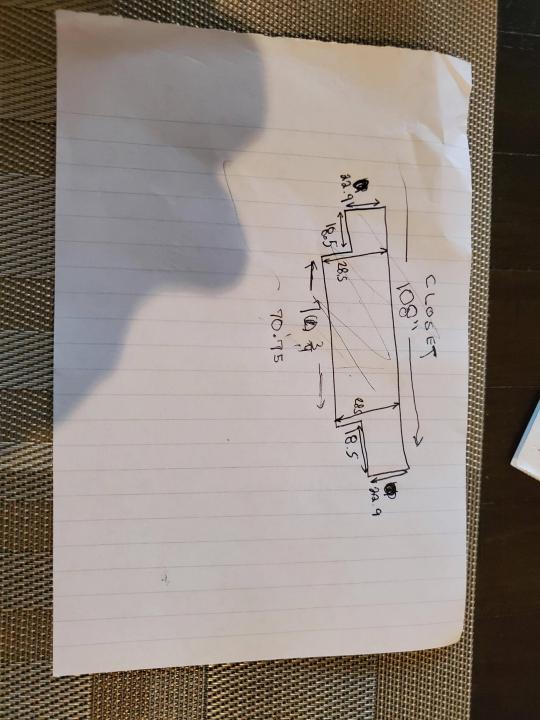
I measured the closet and then went to Home Depot to grab a countertop. Based on the dimensions, it needed to be cut into an object shape you would see on Tetris.

Getting to work, cutting the countertop.
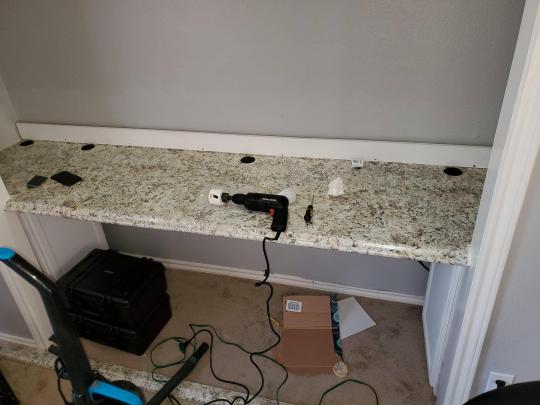
My father-in-law helped me cut it to size in the driveway and then we framed the closet, added in kitchen cabinets to the bottom (used for storage and to hide a UPS). We ran electrical sockets inside the closet. I bought and painted 2 kitchen cabinets which I use for storage under my desk as well.

The holes allowed me to run cables under my desk much easier, I learned many of these techniques on Battlestations subreddit and Setup Wars on Youtube. My daughter was a good helper when it came to finding studs.
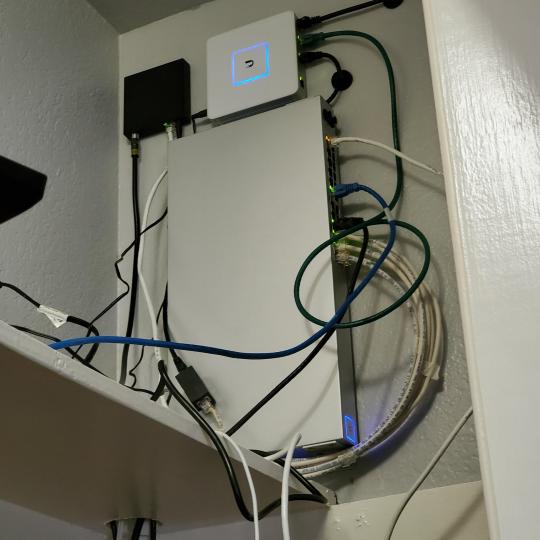
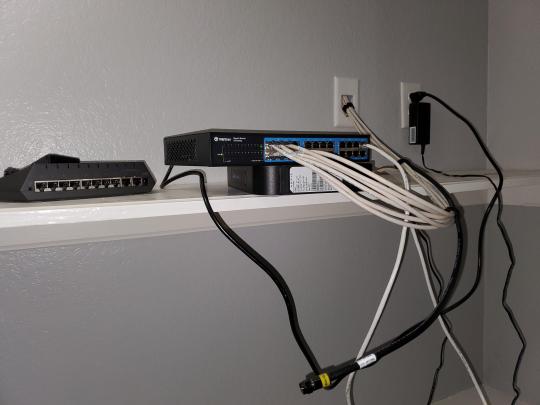
Some of my cousins are networking engineers, they advised me to go with Unifi devices. Here I mounted my Unifi 16 port switch, my Unifi Security Gateway (I'll try out pfSense sometime down the line), and my HD Homerun (big antenna is in the attic). I have Cat6 drops in each room in the house, so everything runs here. On my USG, I have both a LAN #2 and a LAN #1 line running to the 2nd closet in this room (server room). This shot is before the cable management.
Cable management completed in closet #1. Added an access point and connected 3 old Raspberry Pi devices I had laying around (1 for PiHole - Adblocker, 1 for Unbound - Recursive DNS server, and 1 for Privoxy - Non Caching web proxy).
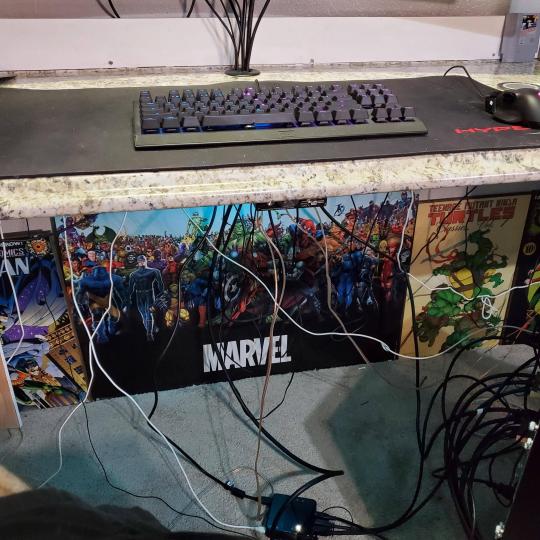
Rats nest of wires under my desk. I mounted an amplifier, optical DVD ROM drive, a USB hub that takes input from up to 4 computers (allows me to switch between servers in closet #2 with my USB mic, camera, keyboard, headset always functioning), and a small pull out drawer.
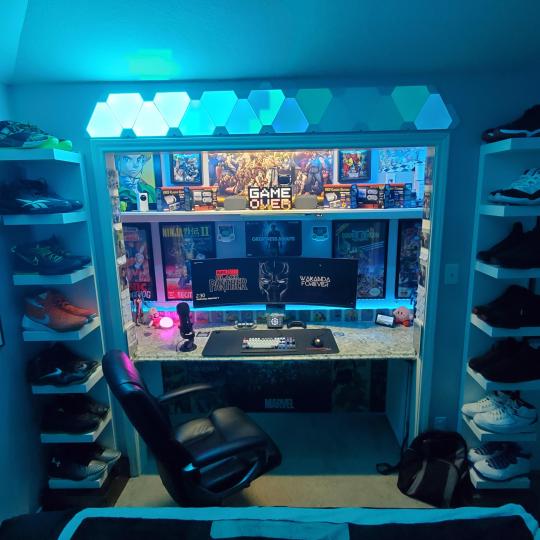
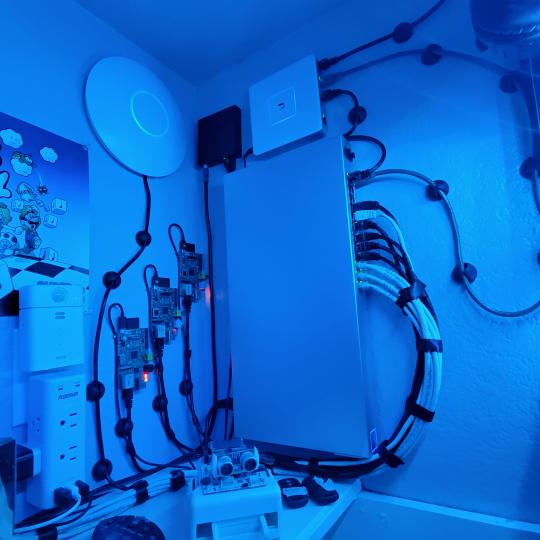
Cable management complete, night shot with with Nanoleaf wall lights. Unifi controller is mounted under the bookshelf, allows me to keep tabs on the network. I have a tablet on each side of the door frame (apps run on there that monitor my self hosted web services). I drilled a 3 inch hole on my desk to fit a grommet wireless phone charger. All my smart lights are either running on a schedule or turn on/off via an Alexa command. All of our smart devices across the house and outside, run on its on VLAN for segmentation purposes.

Quick shot with desk light off. I'm thinking in the future of doing a build that will mount to the wall (where "game over" is shown).
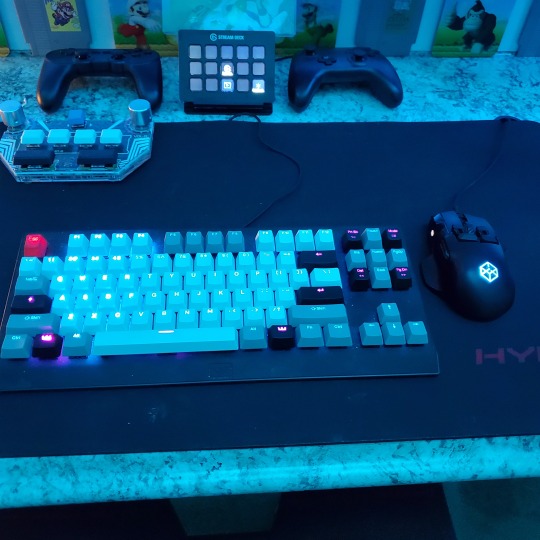
Wooting One keyboard with custom keycaps and Swiftpoint Z mouse, plus Stream Deck (I'm going to make a gaming comeback one day!).

Good wallpapers are hard to find with this resolution so pieced together my own.
Speakers and books at inside corner of desk.

Speakers and books at inside corner of desk.
Closet #2, first look (this is in the same room but off to the other side). Ran a few CAT6 cables from closet #1, into the attic and dropped here (one on LAN #1, the other on LAN #2 for USG). Had to add electrical sockets as well.
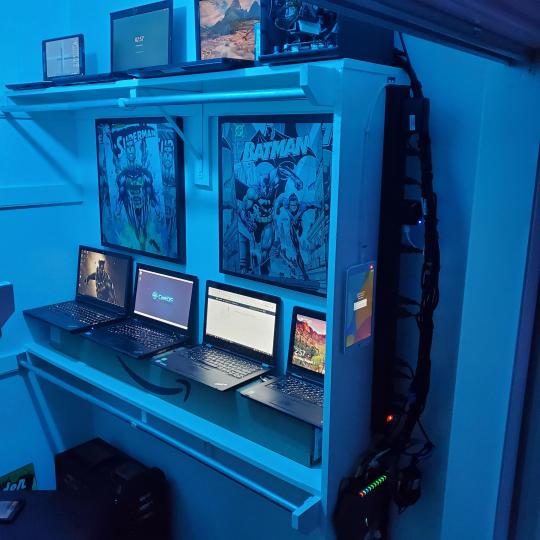
I have owned a ton of Thinkpads since my IBM days, I figured I could test hooking them all up and having them all specialize in different functions (yes, I have a Proxmox box but it's a decommissioned HP Microserver on the top shelf which is getting repurposed with TrueNAS_core). If you're wondering what OSes run on these laptops: Windows 10, Ubuntu, CentOS, AntiX. All of these units are hardwired into my managed Netgear 10gigabit switch (only my servers on the floor have 10 gigabit NICs useful to pass data between the two). Power strip is also mounted on the right side, next to another tablet used for monitoring. These laptop screens are usually turned off.
Computing inventory in image:
Lenovo Yoga Y500, Lenovo Thinkpad T420, Lenovo Thinkpad T430s, Lenovo Thinkpad Yoga 12, Lenovo Thinkpad Yoga 14, Lenovo Thinkpad W541 (used to self host my webservices), Lenovo S10-3T, and HP Microserver N54L

Left side of closet #2
**moved these Pis and unmanaged switch to outside part of closet**
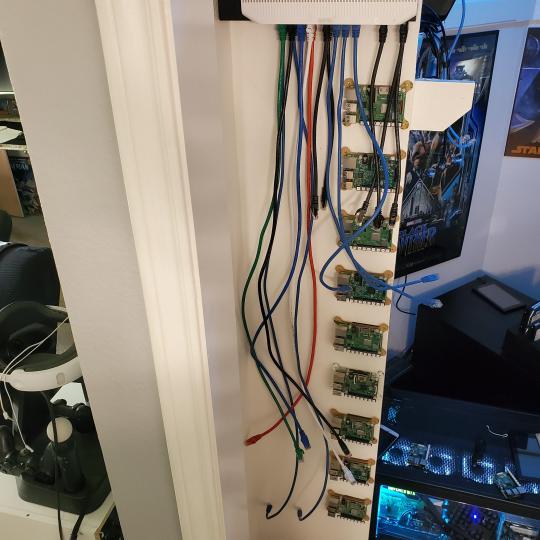
Since I have a bunch of Raspberry Pi 3s, I decided recently to get started with Kubernetes clusters (my time is limited but hoping to have everything going by the holidays 2020) via Rancher, headless. The next image will show the rest of the Pis but in total:
9x Raspberry Pi 3 and 2x Raspberry Pi 4
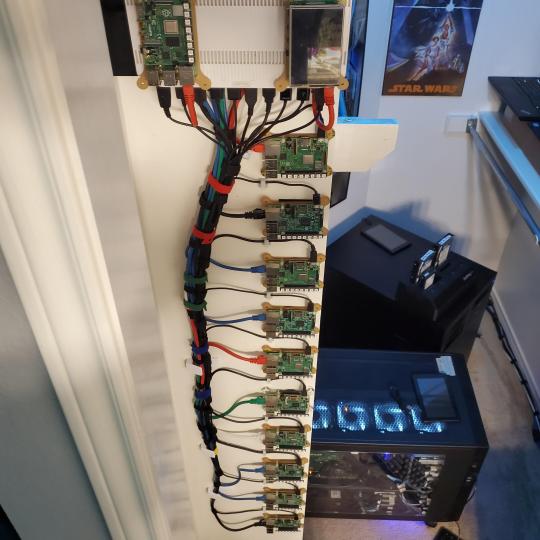
2nd shot with cable management. The idea is to get K3s going, there's Blinkt installed on each Pi, lights will indicate how many pods per node. The Pis are hardwired into a switch which is on LAN #2 (USG). I might also try out Docker Swarm simultaneously on my x86/x64 laptops. Here's my compose generic template (have to re-do the configs at a later data) but gives you an idea of the type of web services I am looking to run: https://gist.github.com/antoinesylvia/3af241cbfa1179ed7806d2cc1c67bd31
20 percent of my web services today run on Docker, the other 80 percent are native installs on Linux and or Windows. Looking to get that up to 90 percent by the summer of 2021.
Basic flow to call web services:
User <--> my.domain (Cloudflare 1st level) <--> (NGINX on-prem, using Auth_Request module with 2FA to unlock backend services) <--> App <--> DB.
If you ever need ideas for what apps to self-host: https://github.com/awesome-selfhosted/awesome-selfhosted
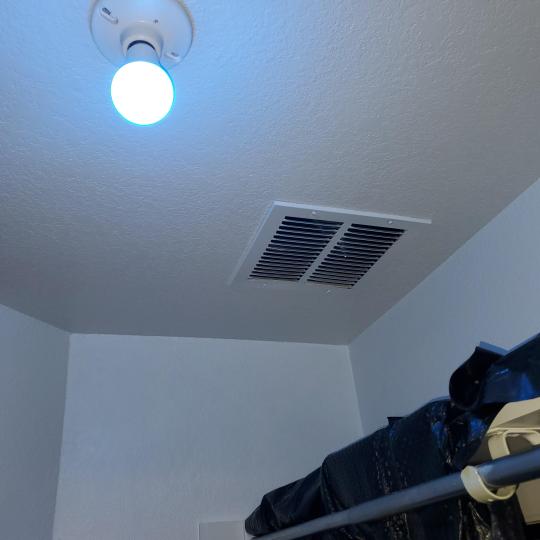
Homelabs get hot, so I had the HVAC folks to come out and install an exhaust in the ceiling and dampers in the attic.
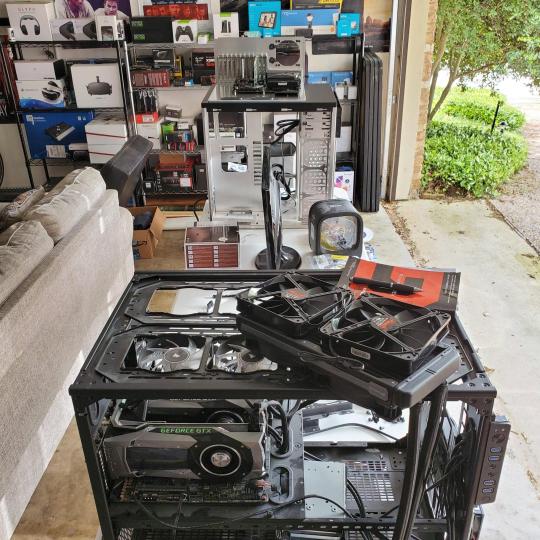
I built my servers in the garage this past winter/spring, a little each night when my daughter allowed me to. The SLI build is actually for Parsec (think of it as a self hosted Stadia but authentication servers are still controlled by a 3rd party), I had the GPUs for years and never really used them until now.
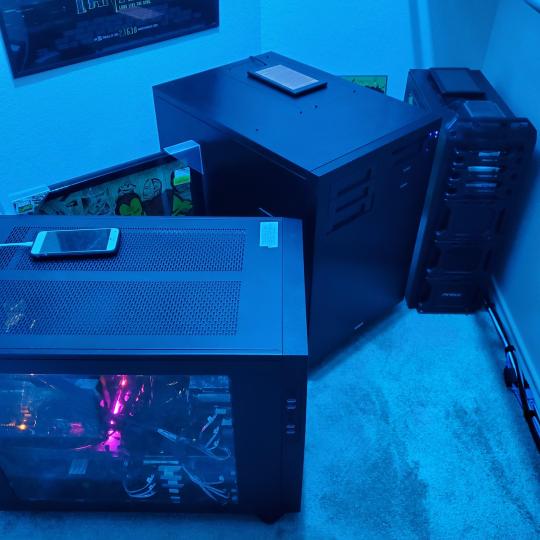
Completed image of my 2 recent builds and old build from 2011.
Retroplex (left machine) - Intel 6850 i7 (6 core, 12 thread), GTX 1080, and 96GB DDR4 RAM. Powers the gaming experience.
Metroplex (middle machine) - AMD Threadripper 1950x (16 core, 32 thread), p2000 GPU, 128GB DDR4 RAM.
HQ 2011 (right machine) - AMD Bulldozer 8150 (8 cores), generic GPU (just so it can boot), 32GB DDR3 RAM.
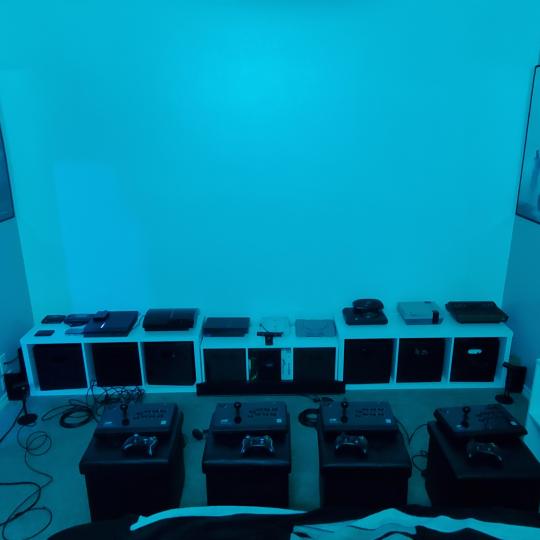
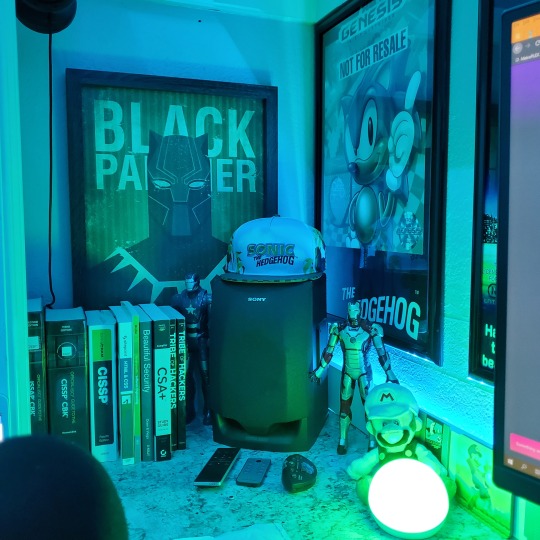
I've been working and labbing so much, I haven't even connected my projector or installed a TV since moving in here 11 months ago. I'm also looking to get some VR going, headset and sensors are connected to my gaming server in closet #2. Anyhow, you see all my PS4 and retro consoles I had growing up such as Atari 2600, NES, Sega Genesis/32X, PS1, Dreamcast, PS2, PS3 and Game Gear. The joysticks are for emulation projects, I use a Front End called AttractMode and script out my own themes (building out a digital history gaming museum).
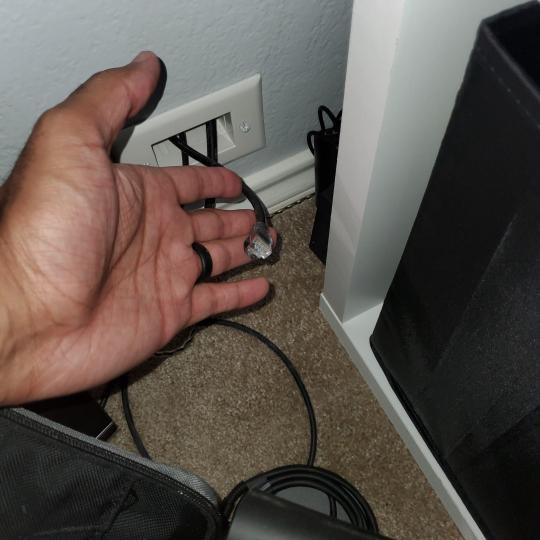
My longest CAT6 drop, from closet #1 to the opposite side of the room. Had to get in a very tight space in my attic to make this happen, I'm 6'8" for context. This allows me to connect this cord to my Unifi Flex Mini, so I can hardware my consoles (PS4, PS5 soon)

Homelab area includes a space for my daughter. She loves pressing power buttons on my servers on the floor, so I had to install decoy buttons and move the real buttons to the backside.
Next project, a bartop with a Raspberry Pi (Retropie project) which will be housed in an iCade shell, swapping out all the buttons. Always have tech projects going on. Small steps each day with limited time.
6 notes
·
View notes
Text
How To Install Kubernetes On Ubuntu 18.04
How To Install Kubernetes On Ubuntu 18.04
This comprehensive Linux guide expects that you run the following commands as root user but if you decide to run the commands as a different user then ensure that the user has sudo access and that you precede each of the privileged commands with sudo
Kubernetes is an open source system for applications management across multiple hosts. It provides basic mechanisms for automating…
View On WordPress
1 note
·
View note
Text
A Vagrant Story
Like everyone else I wish I had more time in the day. In reality, I want to spend more time on fun projects. Blogging and content creation has been a bit on a hiatus but it doesn't mean I have less things to write and talk about. In relation to this rambling I want to evangelize a tool I've been using over the years that saves an enormous amount of time if you're working in diverse sandbox development environments, Vagrant from HashiCorp.
Elevator pitch
Vagrant introduces a declarative model for virtual machines running in a development environment on your desktop. Vagrant supports many common type 2 hypervisors such as KVM, VirtualBox, Hyper-V and the VMware desktop products. The virtual machines are packaged in a format referred to as "boxes" and can be found on vagrantup.com. It's also quite easy to build your own boxes from scratch with another tool from HashiCorp called Packer. Trust me, if containers had not reached the mainstream adoption it has today, Packer would be a household tool. It's a blog post in itself for another day.
Real world use case
I got roped into a support case with a customer recently. They were using the HPE Nimble Storage Volume Plugin for Docker with a particular version of NimbleOS, Docker and docker-compose. The toolchain exhibited a weird behavior that would require two docker hosts and a few iterations to reproduce the issue. I had this environment stood up, diagnosed and replied to the support team with a customer facing response in less than an hour, thanks to Vagrant.
vagrant init
Let's elaborate on how to get a similar environment set up that I used in my support engagement off the ground. Let's assume vagrant and a supported type 2 hypervisor is installed. This example will work on Windows, Linux and Mac.
Create a new project folder and instantiate a new Vagrantfile. I use a collection of boxes built from these sources. Bento boxes provide broad coverage of providers and a variety of Linux flavors.
mkdir myproj && cd myproj vagrant init bento/ubuntu-20.04 A `Vagrantfile` has been placed in this directory. You are now ready to `vagrant up` your first virtual environment! Please read the comments in the Vagrantfile as well as documentation on `vagrantup.com` for more information on using Vagrant.
There's now a Vagrantfile in the current directory. There's a lot of commentary in the file to allow customization of the environment. It's possible to declare multiple machines in one Vagrantfile, but for the sake of an introduction, we'll explore setting up a single VM.
One of the more useful features is that Vagrant support "provisioners" that runs at first boot. It makes it easy to control the initial state and reproduce initialization with a few keystrokes. I usually write Ansible playbooks for more elaborate projects. For this exercise we'll use the inline shell provisioner to install and start docker.
Vagrant.configure("2") do |config| config.vm.box = "bento/ubuntu-20.04" config.vm.provision "shell", inline: <<-SHELL apt-get update apt-get install -y docker.io python3-pip pip3 install docker-compose usermod -a -G docker vagrant systemctl enable --now docker SHELL end
Prepare for very verbose output as we bring up the VM.
Note: The vagrant command always assumes working on the Vagrantfile in the current directory.
vagrant up
After the provisioning steps, a new VM is up and running from a thinly cloned disk of the source box. Initial download may take a while but the instance should be up in a minute or so.
Post-declaration tricks
There are some must-know Vagrant environment tricks that differentiate Vagrant from right-clicking in vCenter or fumbling in the VirtualBox UI.
SSH access
Accessing the shell of the VM can be done in two ways, most commonly is to simply do vagrant ssh and that will drop you at the prompt of the VM with the predefined user "vagrant". This method is not very practical if using other SSH-based tools like scp or doing advanced tunneling. Vagrant keeps track of the SSH connection information and have the capability to spit it out in a SSH config file and then the SSH tooling may reference the file. Example:
vagrant ssh-config > ssh-config ssh -F ssh-config default
Host shared directory
Inside the VM, /vagrant is shared with the host. This is immensely helpful as any apps your developing for the particular environment can be stored on the host and worked on from the convenience of your desktop. As an example, if I were to use the customer supplied docker-compose.yml and Dockerfile, I'd store those in /vagrant/app which in turn would correspond to my <current working directory for the project>/app.
Pushing and popping
Vagrant supports using the hypervisor snapshot capabilities. However, it does come with a very intuitive twist. Assume we want to store the initial boot state, let's push!
vagrant snapshot push ==> default: Snapshotting the machine as 'push_1590949049_3804'... ==> default: Snapshot saved! You can restore the snapshot at any time by ==> default: using `vagrant snapshot restore`. You can delete it using ==> default: `vagrant snapshot delete`.
There's now a VM snapshot of this environment (if it was a multi-machine setup, a snapshot would be created on all the VMs). The snapshot we took is now on top of the stack. Reverting to the top of the stack, simply pop back:
vagrant snapshot pop --no-delete ==> default: Forcing shutdown of VM... ==> default: Restoring the snapshot 'push_1590949049_3804'... ==> default: Checking if box 'bento/ubuntu-20.04' version '202004.27.0' is up to date... ==> default: Resuming suspended VM... ==> default: Booting VM... ==> default: Waiting for machine to boot. This may take a few minutes... default: SSH address: 127.0.0.1:2222 default: SSH username: vagrant default: SSH auth method: private key ==> default: Machine booted and ready! ==> default: Machine already provisioned. Run `vagrant provision` or use the `--provision` ==> default: flag to force provisioning. Provisioners marked to run always will still run.
You're now back to the previous state. The snapshot sub-command allows restoring to a particular snapshot and it's possible to have multiple states with sensible names too, if stepping through debugging scenarios or experimenting with named states.
Summary
These days there's a lot of compute and memory available on modern laptops and desktops. Why run development in the cloud or a remote DC when all you need is available right under your finger tips? Sure, you can't run a full blown OpenShift or HPE Container Platform but you can certainly run a representable Kubernetes clusters where minishift, microk8s and the likes won't work if you need access to the host OS (yes, I'm in the storage biz). In a recent personal project I've used this tool to simply make Kubernetes clusters with Vagrant. It works surprisingly well and allow a ton of customization.
Bonus trivia
Vagrant Story is a 20 year old videogame for PlayStation (one) from SquareSoft (now SquareEnix). It features a unique battle system I've never seen anywhere else to this day and it was one of those games I played back-to-back three times over. It's awesome. Check it out on Wikipedia.
1 note
·
View note
Text
How to Install Kubernetes on Ubuntu 18?
How to Install Kubernetes on Ubuntu 18?
Kubernetes is an open-source container orchestration tool developed by Google. In this article, you will learn how to set up Kubernetes with a master node and a worker node. Make sure you have Docker installed on both master and worker node.
Environment Details and Setup
For the demonstration, I have 2 Ubuntu systems, one will be the master node, and the other one will be the worker node. Both…
View On WordPress
#Container Orchestration#Docker#How to Install Kubernetes on Ubuntu#Install Kubernetes#Install Kubernetes on Ubuntu#Kubernetes#Master and Worker Node#Master Node#nodes in the kubernetes cluster#Worker Node
0 notes
Text
Cheat Sheet: How to install Kubernetes via kubadm on Ubuntu 24.04 (and trying to join it as an additional master to an existing cluster)
ChatGPT helped in this task, but some commands did not work immediately, so I had to ask ChatCPT how to fix the errors I encountered. The command presented here leads through the process of installing Kubernetes using kubeadm on a fresh Ubuntu 24.04 system without any errors (as long as the world does not change too much). Step 1: Install kubeadm, kubelet and kubectl MAJOR_VERSION=1.26 # Add GPG…
0 notes
Text
Welcome to this exhilarating tutorial on how to deploy and use Quarkus in Kubernetes. Kubernetes is one of the open-source tools currently preferred when automating system deployments. It makes it easy to scale and manage containerized applications. Kubernetes works by distributing workloads across the cluster and automating the container networking needs. Also, storage and persistent volumes are allocated, by doing so the desired state of container applications is continuously maintained. Quarkus offers provides an easy way to automatically generate the Kubernetes resources based on some defaults and the user-provided configuration. This Kubernetes-native Java framework also provides an extension used to build and push container images to a registry before the application is deployed to the target. Another feature about Quarkus is that it enabled one to use the Kubernetes ConfigMap as a configuration source without mounting them on the pod. The cool features associated with Quarkus are: Community and Standards: It provides a cohesive and fun-to-use full-stack framework by leveraging a growing list of over fifty best-of-breed libraries that you love and use Container First: It offers amazingly fast boot time, incredibly low RSS memory (not just heap size!) offering near-instant scale-up and high density memory utilization in container orchestration platforms like Kubernetes Unifies imperative and reactive: It allows developers to combine both the familiar imperative code and the reactive style when developing applications. Kube-Native: The combination of Quarkus and Kubernetes provides an ideal environment for creating scalable, fast, and lightweight applications. It highly increases the developer productivity with tooling, pre-built integrations, application services e.t.c By following this guide to the end, you will learn how to: Use Quarkus Dekorate extension to automatically generate Kubernetes manifests based on the source code and configuration Build and push images to Docker registry with Jib extension Deploy an application on Kubernetes without any manually created YAML in one click Use Quarkus Kubernetes Config to inject configuration properties from ConfigMap Let’s dive in! Setup Pre-requisites For this guide, you will require: Quarkus CLI Apache Maven 3.8.1+ (Optional) Access to a Kubernetes cluster A Kubernetes cluster can be deployed with the aid of the guides below: Run Kubernetes on Debian with Minikube Deploy Kubernetes Cluster on Linux With k0s Install Kubernetes Cluster on Ubuntu using K3s Install Kubernetes Cluster on Rocky Linux 8 with Kubeadm & CRI-O Once the cluster is running, install kubectl curl -LO "https://storage.googleapis.com/kubernetes-release/release/$(curl -s https://storage.googleapis.com/kubernetes-release/release/stable.txt)/bin/linux/amd64/kubectl" chmod +x kubectl sudo mv kubectl /usr/local/bin Ensure that you can access the cluster. # For k0s export KUBECONFIG=/var/lib/k0s/pki/admin.conf 1. Install Quarkus CLI The Quarkus CLI can be installed on Linux, macOS, and Windows (using WSL or bash compatible shell-like Cygwin or MinGW) by running the below commands: curl -Ls https://sh.jbang.dev | bash -s - trust add https://repo1.maven.org/maven2/io/quarkus/quarkus-cli/ curl -Ls https://sh.jbang.dev | bash -s - app install --fresh --force quarkus@quarkusio You can install it on Windows systems using the Powershell: iex "& $(iwr https://ps.jbang.dev) trust add https://repo1.maven.org/maven2/io/quarkus/quarkus-cli/" iex "& $(iwr https://ps.jbang.dev) app install --fresh --force quarkus@quarkusio" Once installed, restart your shell. The Quarkus CLI can also be installed using SDKMAN as below: sdk install quarkus 2. Create a Project Use the Quarkus command-line interface (CLI) to create a new project. The below command adds resteasy-reactive, Jib, and kubernetes dependencies. quarkus create app quarkus-example --extension=resteasy-reactive,kubernetes,jib
cd quarkus-example Sample Output: After this, you will have several files generated, among these files is the pom.xml file bearing dependencies to the build file: ......... io.quarkus quarkus-resteasy-reactive io.quarkus quarkus-kubernetes io.quarkus quarkus-container-image-jib ...... The good thing with Quarkus is that it generates Deployment/StatefulSet resources that it use your registry_username/test-quarkus-app:tag as the container image of the Pod. The image here is controlled by the Jib extension and can be customized using the application.properties as shown: Open the file for editing: vim src/main/resources/application.properties Add the following lines replacing where required. quarkus.container-image.group=registry_username quarkus.container-image.name=tutorial-app quarkus.container-image.tag=latest quarkus.container-image.username=registry_username quarkus.container-image.password=Your_registry -Password If no registry has not been specified, the default, docker.io registry will be used. A detailed demonstration on specifying a registry has been captured elsewhere in this guide. 3. Build and Deploy your Application Jib is used to build optimized images for Java applications without a Docker daemon and no need for the mastery of deep docker practices. Dekorate is a Java library that makes it simple to generate and decorate Kubernetes manifests. It generates manifests based on the annotations, source code, and configuration variables. Now build and deploy your application using Quarkus CLI: quarkus build -Dquarkus.container-image.push=true Sample Output: After the build process, you will have two files named kubernetes.json and kubernetes.yml under the target/kubernetes/ directory. # ls target/kubernetes kubernetes.json kubernetes.yml Both files contain both the Kubernetes Deployment and Service. For example, the kubernetes.yml file looks like this: # cat target/kubernetes/kubernetes.yml --- apiVersion: v1 kind: Service metadata: annotations: app.quarkus.io/build-timestamp: 2022-07-09 - 10:55:08 +0000 labels: app.kubernetes.io/name: tutorial-app app.kubernetes.io/version: latest name: tutorial-app spec: ports: - name: http port: 80 targetPort: 8080 selector: app.kubernetes.io/name: tutorial-app app.kubernetes.io/version: latest type: LoadBalancer --- apiVersion: apps/v1 kind: Deployment metadata: annotations: app.quarkus.io/build-timestamp: 2022-07-09 - 10:55:08 +0000 labels: app.kubernetes.io/version: latest app.kubernetes.io/name: tutorial-app name: tutorial-app spec: replicas: 1 selector: matchLabels: app.kubernetes.io/version: latest app.kubernetes.io/name: tutorial-app template: metadata: annotations: app.quarkus.io/build-timestamp: 2022-07-09 - 10:55:08 +0000 labels: app.kubernetes.io/version: latest app.kubernetes.io/name: tutorial-app spec: containers: - env: - name: KUBERNETES_NAMESPACE valueFrom: fieldRef: fieldPath: metadata.namespace image: registry_username/tutorial-app:latest imagePullPolicy: Always name: tutorial-app ports: - containerPort: 8080 name: http protocol: TCP You will also have the image pushed to your registry. DockerHub for this example: It is possible to generate a StatefulSet resource instead of the default Deployment resource via the application.properties; quarkus.kubernetes.deployment-kind=StatefulSet Now deploy the application to your Kubernetes cluster using any of the two manifests. For example: kubectl apply -f target/kubernetes/kubernetes.yml Verify if the deployment is up: # kubectl get deploy NAME READY UP-TO-DATE AVAILABLE AGE tutorial-app 1/1 1 1 13s
# kubectl get pods NAME READY STATUS RESTARTS AGE tutorial-app-bc774dc8d-k494g 1/1 Running 0 19s Check if the service is running: # kubectl get svc NAME TYPE CLUSTER-IP EXTERNAL-IP PORT(S) AGE kubernetes ClusterIP 10.96.0.1 443/TCP 31m tutorial-app LoadBalancer 10.102.87.114 80:30400/TCP 4m53s Access the deployment using the provided port 30400. This can be done using a web browser with the URL http://IP_Address:30400/hello Or from the terminal as shown: $ curl 192.168.205.4:30400/hello Hello from RESTEasy Reactive This is the output of the file at src/main/java/org/acme/GreetingResource.java 4. Tuning the generated resources using application.properties Quarkus allows one to tune the generated manifest using the application.properties file. Through this file, several configurations can be made. These include: A. Namespace Quarkus allows one to run the application in a chosen namespace. It omits the namespace in the generated manifest rather than enforcing it in the default namespace. Therefore, you can run the application in the desired namespace say test using the command: kubectl apply -f target/kubernetes/kubernetes.yml -n=test Aside from specifying the namespace when running the Kubernetes command, you can still capture the namespace in the application.properties as shown: quarkus.kubernetes.namespace=mynamespace Replace mynamespace with the desired namespace for the application. B. Defining a Docker registry There are several other registries that can be defined. If left undefined, docker.io is used. If you want ot use another registry such as quay.io, then you need to specify it: quarkus.container-image.registry=my.docker-registry.net my.docker-registry.net is the registry you want to use. C. Environment variables There are several ways of defining variables on Kubernetes. These includes: key/value pairs import all values from a Secret or ConfigMap interpolate a single value identified by a given field in a Secret or ConfigMap interpolate a value from a field within the same resource Environment variables from key/value pairs To add environment variables from key/value pairs, use the below syntax: quarkus.kubernetes.env.vars.my-env-var=foobar This adds MY_ENV_VAR=foobar as an environment variable. my-env-var is converted to uppercase and the dashes are replaced with underscores to result in MY_ENV_VAR. Environment variables from Secret To add key/value pairs of Secret as environment variables, add the lines below to application.properties: quarkus.kubernetes.env.secrets=my-secret,my-other-secret This will result in the following in the container environment: envFrom: - secretRef: name: my-secret optional: false - secretRef: name: my-other-secret optional: false You can set the variable by extracting a value defined by keyName form the my-secret: quarkus.kubernetes.env.mapping.foo.from-secret=my-secret quarkus.kubernetes.env.mapping.foo.with-key=keyName Resulting into: - env: - name: FOO valueFrom: secretKeyRef: key: keyName name: my-secret optional: false Environment variables from ConfigMap Quarkus can be used to add key/value pairs from ConfigMap as environment variables. To achieve this, you need to add the lines below separating the ConfigMap to be used as a source by a comma. For example: quarkus.kubernetes.env.configmaps=my-config-map,another-config-map This will result into: envFrom: - configMapRef: name: my-config-map optional: false - configMapRef: name: another-config-map optional: false It is also possible to extract keyName field from the my-config-map by using: quarkus.kubernetes.env.mapping.foo.from-configmap=my-configmap quarkus.kubernetes.env.mapping.foo.with-key=keyName This will generate a manifest with the below lines:
- env: - name: FOO valueFrom: configMapRefKey: key: keyName name: my-configmap optional: false That is it! Closing Thoughts That summarizes this guide on how to deploy and use Quarkus in Kubernetes. I am sure that you are now in a position to generate the Kubernetes resources based on some defaults and the user-provided configuration using Quarkus. I hope this was valuable.
0 notes
Text
Activation code for easy translator 12.5

#ACTIVATION CODE FOR EASY TRANSLATOR 12.5 UPDATE#
#ACTIVATION CODE FOR EASY TRANSLATOR 12.5 UPGRADE#
#ACTIVATION CODE FOR EASY TRANSLATOR 12.5 SOFTWARE#
Now, we can dive into a more elaborate answer.
#ACTIVATION CODE FOR EASY TRANSLATOR 12.5 SOFTWARE#
Does the Linux Kernel need software engineering? – Maíra Canalįor those looking for a short answer: yes, it does.**kicontheme**, **kid3**, **kidentitymanagement**, **kidletime**, **kig**, **kigo** from the Slackware **kde** package set. GNU World Order (Audio Show) ☛ GNU World Order 474.One of the most often complaints that you will hear about Linux is that there are too many distros that all do the same thing Video ☛ Manjaro and EndeavourOS are like Ding Dongs and Zingers – Invidious.
#ACTIVATION CODE FOR EASY TRANSLATOR 12.5 UPDATE#
On this episode of This Week in Linux: Happy 25th Birthday to GNOME, KDE Gear 22.08 Released, LibreOffice 7.4 Released, Android 13 Released, GLIBC Update Breaks Easy Anti-Cheat, John Deere Tractor Hacked To Run Doom, Krita 5.1 Released, Introducing the Horizon Linux project, Neptune 7.5, Humble Bundle Summer Sale, Spider-Man Remastered On Linux Via Proton, all that and much more on Your Weekly Source for Linux GNews!
Tux Digital ☛ 210: GNOME, KDE, LibreOffice, Android 13, DEF CON, Krita, Spider-Man and more Linux news!.
The longer version of this is in How we handle Ubuntu LTS versions.
#ACTIVATION CODE FOR EASY TRANSLATOR 12.5 UPGRADE#
The every two year machines upgrade to every LTS version the every four year machines upgrade every other LTS version, as their old LTS version threatens to fall out of support. We have long had a habit of upgrading machines between Ubuntu versions either every two years (for most machines that users log in to or directly use) or every four years (although the past two years are an exception).
uni Toronto ☛ Our slow turnover of servers and server generations.
It abstracts many common kubectl commands and maps them to just a few shortcut keys or clicks of the mouse. Fortunately, there is a terminal UI called K9s that makes interacting with your cluster faster and easier. Not the longest command, but typing things like this over an over can get cumbersome. Kubectl edit deployment/mydeployment -o yaml -save-config For example, here is a command for editing a deployment: Though the CLI is robust, commands can quickly become cumbersome to run. However, one needs to know many commands to fetch metrics and operate a Kubernetes cluster using Kubectl. Kubectl is the de facto and most popular Kubernetes command line tool used for accessing Kubernetes cluster metrics.
Earthly ☛ A guide to swiftly managing your Kubernetes resources using K9s – Earthly Blog.
It dual-boots Windows and Linux and is my only x86-64 computer. And, yes, I’ve installed Ubuntu MATE (a semi-official distro that has dedicated builds for this hardware) and Emacs on it, and I program on it. Granted, I’ve only had it for a month, so it may be a novelty effect that’ll wane over time, but still: I’m impressed. Guess which of these two I find myself using more? That’s right, the GPD Micro. This article forms part of our Linux Around The World series. We cover events and user groups that are running in Kosovo.
Linux Links ☛ Linux Around The World: Kosovo – LinuxLinks.
Freedom of Information / Freedom of the Press.
1 note
·
View note
Text
Zipsplit windows

#Zipsplit windows how to#
#Zipsplit windows zip file#
#Zipsplit windows archive#
#Zipsplit windows zip#
Java: build OCI compatible image for Spring Boot web app using jib.Prometheus: sending a test alert through AlertManager.Prometheus: adding a Grafana dashboard using a ConfigMap.Prometheus: monitoring a custom Service using ServiceMonitor and PrometheusRule.Prometheus: monitoring services using additional scrape config for Prometheus Operator.Prometheus: installing kube-prometheus-stack on a kubeadm cluster.Kubernetes: independent nf for CoreDNS with kubeadm.Kubernetes: independent nf for CoreDNS with K3s.Kubernetes: custom upstream for domain with CoreDNS.Buildah: Installing buildah and podman on Ubuntu 20.04.Java: creating OCI-compatible image for Spring Boot web using buildah.Kubernetes: accessing the Kubernetes Dashboard with least privilege.KVM: configuring a base Window2019 instance with Sysprep.KVM: creating a Windows2019 Domain Controller using Powershell.KVM: Creating a Windows2019 ADFS server using Powershell.Gradle: fixing the gradle wrapper for a Java project.GoLang: Installing the Go Programming language on Ubuntu 20.04.Microsoft: configuring an Application Group for OAuth2/OIDC on ADFS 2019.Java: Spring Security OAuth2/OIDC protecting Client App and Resource Server.Gradle: interactive JDWP debugging of bootRun gradle task in Eclipse IDE.Python: Flask-OIDC protecting Client App and Resource Server using Windows 2019 ADFS.Kubernetes: Keycloak IAM deployed into Kubernetes cluster for OAuth2/OIDC.Kubernetes: copying files into and out of containers without ‘kubectl cp’.OAuth2: Configuring okta for OAuth2/OIDC.OAuth2: Configuring Google for OAuth2/OIDC.KVM: Creating a bridged network with NetPlan on Ubuntu 22.04.Linux: Mounting a loopback ext4/xfs filesystem to isolate or enforce storage limits.
#Zipsplit windows zip#
Linux: Excluding directories when using zip.
Linux: Use stat to verify permissions and ownership.
Ubuntu: Creating a Samba/CIFS share to quickly share files with Windows.
Linux: Using zip/unzip to add, update, and remove files from a Java jar/war.
Valid suffixes for size units are (b|k|m|g).
#Zipsplit windows archive#
# OR mend original archive, but do not extract content yetĬreate split archive on Linux, extract on WindowsĬonversely, if you want to create a split archive from Linux with 100k per file: 7z -v100k a fromlinux.7z įrom Window you would right-click on the “fromlinux.7z.001” file, and select “Extract here” to unzip the content. Then you can transfer this to a Linux host and use the following to extract it. I find that using 7zip provides easy interoperability across Linux and Windows.Ĭreating a split archive on Windows is detailed in posts like this (Note that it works using either 7zip or zip format). While there are many ways to do the same thing using utilities like zip, split, etc. Taking this a step further and splitting this archive into manageable chunks allows you to take advantage of parallel transfer. If you’d like to change the location where the files will be extracted, click “Browse,” and then navigate to the desired drive or folder.If you are transferring large files between systems, it can be advantageous to create a compressed archive using a tool like 7zip. In the “Extract Compressed (Zipped) Folders” window that appears, you’ll see the current file path as the default location for the unzipped files. Next, right-click the file and select “Extract All” in the menu.
#Zipsplit windows zip file#
First, locate the ZIP file that you’d like to extract in File Explorer.
#Zipsplit windows how to#
RELATED: Everything You Need to Know About Zip Files How to Extract a Zip File in Windows 11Įxtracting (unzipping) ZIP files in Windows 11 is just as easy as zipping them. Now that you have a ZIP file, you can copy it or share it like any other kind of file. When you’re ready, press Enter.Īnd that’s all there is to it! Pretty simple. Type a new file name or leave the default name in place. The ZIP file name will highlight, allowing you to type in whatever name you’d like. After a moment, your ZIP file will appear in the same folder as the source files that you just compressed.
0 notes
Text
Kusama: How to easily deploy nodes for your business
Deploying nodes for your business can be a daunting task. Luckily, with the help of Kusama, it is easy to get started. Kusama provides a simple platform for deploying nodes, making it easy to manage and deploy nodes in a secure manner.
Deploying Kusama nodes for your business can be easy, with a few steps. Kusama provides an open source platform that makes it easy to create and manage nodes. All you need is a computer and an internet connection, and you can start using Kusama right away.
Deploying nodes for your business can be a daunting task. Luckily, you don't have to do it alone. Kusama provides a scalable and easy-to-use platform that makes it simple to get started. With Kusama, you can deploy nodes quickly and easily, without any prior experience or technical knowledge. The Kusama company provides a platform to easily deploy nodes for your business. With Kusama, businesses can create and manage their own private or public Kubernetes clusters in minutes, without any prior knowledge of the system. Kubernetes is an open-source software that automates the deployment, scaling, and management of containers across a fleet of servers. Deploying Kubernetes quickly and efficiently can help your business save time and money on server maintenance.
Deploying Kubernetes on your own servers can be a challenging task. With this guide, you'll learn how to easily deploy nodes for your business using the Kubernetes Dashboard and Kubeadm. You'll also discover how to create, manage and scale your own Kubernetes cluster. Deploy Kusama nodes for your business can be a breeze with the right tools and guidance. Kusama provides an easy to use installer that installs the necessary software on each node. Additionally, Kusama offers support and resources to help you get started quickly. With a little bit of preparation, you can have your own Kusama network up and running in no time!
Deploying Kusama nodes is easy. You can use our cloud-based deployment tool or you can deploy Kusama nodes directly on your own servers. Once you have deployed Kusama nodes, you will be able to access the Kubernetes control plane and use our powerful features to manage your Kubernetes deployments.
Node deployment is essential for any business. With the right tools, it can be a breeze to get up and running with nodes. In this article, we'll outline six tools that make node deployment easy. Each of these tools is open source software that you can use to deploy Kubernetes nodes. We'll also discuss how they work and how they compare to each other. The Six Tools Each of the six tools we'll be discussing here has a different purpose.
Deploying Kubernetes for your business can be a daunting task, but with the right tools and guidance it can be a simple process. In this article, we'll walk you through how to deploy Kubernetes on Ubuntu 16.04, using Ansible and artisan. We'll also cover some best practices for deploying Kubernetes, so that you can ensure reliable performance and scalable growth for your business.
1 note
·
View note
Link
Minikube is an open source tool that was developed to enable developers and system administrators to run a single cluster of Kubernetes on their local machine. Minikube starts a single node kubernetes cluster locally with small resource utilization. This is ideal for development tests.
https://techiio.com/blog/rakeshrestha/minikube-single-cluster-of-kubernetes
0 notes
Text
How to install Minikube on Ubuntu 22.04
How to install Minikube on Ubuntu 22.04
Minikube is a tool that makes it easy to run Kubernetes locally. Minikube runs a single-node Kubernetes cluster inside a VM on your local machine. Kubernetes quickly set up a local Kubernetes cluster on Linux, Windows, and macOS. It is always advisable before diving into Kubernetes, you will need a minimal Kubernetes setup. Such a setup should spin up fast and integrate well with other…
View On WordPress
0 notes